It is easy to learn how to take a professional photo of yourself if you know what to do, and most importantly, what not to do. Follow these 3 simple rules and you will be able to take great selfies and dramatically improve your professional image.
So why do you need a professional photo of yourself?
Your image to the world is your first impression and statement of who you are and what you represent. Making sure that picture is accurate of yourself and your values is very important if you want to be taken seriously in your professional life.
All the other stuff like remote triggers, high end camera, prime lens, or a great background are all nice. These items will for sure improve your photos, but you can make due without them if you are a little creative.
Of course, having a friend take your professional photo is always best but may not be possible. Having someone to interact with during the photo shoot is important to getting the right smile and look, but sometimes its just more practical to take a selfie.
Pretty much taking a great portrait of yourself or someone else requires 3 critical items.
Great Lighting
An Adjustable Tripod
A great Photo Editing Package
Here’s How to Take a Professional Photo of Yourself
Great Lighting
Great lighting is the most important item in any photo, especially a headshot or portrait. The more controlled lighting the better.
Let me say this another way.
Lighting is Everything!
Before you start throwing light at your picture, figure out what type of picture you want to take. You can use Google and just search for headshot examples and find one you want to replicate.
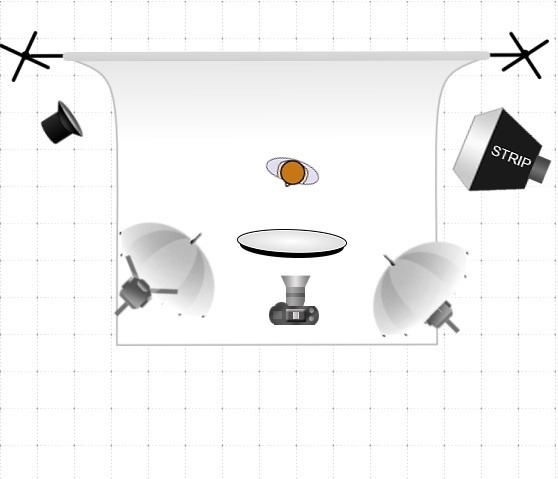
Another great way is to find a lighting diagram with examples. This will tell you exactly how to recreate the picture with light, camera, background, and model placement.
Here is my standard lighting for white backgrounds (high-key) portraits and headshots. I usually also add a hair light. When using a dark background, I remove the background lights and change to softboxes (I avoid spilling light on the background). Flash power is adjusted for each shoot.
Here is a list of places I like to use: and my standard lighting layout for most headshots and portraits. I
Great lighting can happen one of two ways. You can either capture it naturally or recreate it with flashes.
If you want to capture it naturally, you need to schedule your portrait during the golden hours. This is typically 1 hours before or after the sun sets or rises.
I prefer to work at a time that is more convenient to me so I tend to use flashes to recreate my preferred lighting. This is not required but is my preference.
To recreate great light, you need a few speedlights. I recommend these flashes and triggers. A while ago, I wrote separate articles about them and I have used them for several years now without any issues. I absolutely love mine.
When putting your studio together, make sure not to mix your lights.
Light Temperature
I want this to be a simple article but I cannot proceed without a little advice on lighting types. Light has many different temperatures and generally can be divided into either soft light or daylight.
Soft light is the more orange light you get from sun rise and sun setting natural light.
Daylight tends to be brighter and a little blue in color.
You can buy light bulbs in either soft or day light temperatures. It is critical not to mix these lighting when taking your picture. Pick one and stick with it. Speedlite’s produce daylight color so you do not want to mix them with softer light usually preferred in the home.
Light Quality
Light can have a lot of different quality but to make this simple, we will just talk about hard and soft light. Hard light will produce a lot of shadows. Soft light (different then the color of soft light) will produce very few shadows.
The softer the light, the larger the light source will be. This usually requires some type of light modifier like a softbox or umbrella. A cheap way to do this is to bounce your light off a white wall. This will send light all over your subject and reduce the shadows. It will also require a very powerful speedlite.
Hard light is usually very small (think flashlight) and focused directly on the subject. This is normally what you get in most photos when a flash is pointed directly at your subject.
The rule of thumb to follow is men usually look better with hard light and ladies look better with soft light but feel free to be creative using this rule. Some shadows flatter your subject and some don’t.
Adjustable Tripod
This is easy. You just need a way to position your camera so you will be at the right angle to your light, background, and youself. This can be a full sized tripod or just a tabletop one. This is not expensive either and the price ranges from under $10 to over $100.
If you have a DSLR, then get your self a good tripod. I recommend this one that I bought and created a review about.
If you are on a tight budget, I created another article with a list of the best accessories for under $30. In that list I included a tabletop tripod that would work great.
If the budget is really tight and all you have available is an iPhone. It may be possible to take a decent looking portrait with an iPhone and a selfie stick. You will still need great lighting and editing software but the selfie stick can replace the tripod.
I would recommend placing the phone on a pillow attached to the selfie stick. The stick will be used to adjust the phone a little and be used as the remote trigger.
You will be fully dependent on natural lighting (either sunlight or house lights) so make sure you have the right quality of light. This will not produce a professional looking picture but allow you to practice your angles and lighting and may produce something decent.
A Great Photo Editing Package
We all know that Photoshop rules the world when it comes to photo editing but I have never liked it. In the past, I bought 2 versions and also tried several other of Adobe packages like Lightroom and Express. I tried my best to use them but I never liked the idea of writing all my photo changes to a database and not to the photo itself.
I have reviewed many different photo packages and my favorite today is PhotoScape X Pro.
The software is available for Windows and Mac, and available on both app stores. There are 2 versions available, the free and pro versions. I have everything I need in the free version so I never bought the pro but I would in a heartbeat if I never needed one of the advanced features.
I will need to create several articles on how to use the package because you can do just about anything with it. The one area where it lacks is in metadata tagging but I make due with other software to manage my tags.
The software will also edit RAW images too so you can take your high resolution images and edit them.
I will agree to all the professionals out there that Photoshop and Lightroom will do a better job. If my livelihood depended on the quality of my pictures, I would probably use Adobe. Since it doesn’t, I don’t need to waste thousands of dollars on Adobe. I get to use Gimp and PhotoScape and love both.
I also adjust color levels and do minor editing as needed. This package can do all that plus:
Batch edits
Cutouts or change parts of the picture
Create collage
Combine images
Create GIF images
Create images with text layers
Plus much more
Little advice. I always try and take a wider angle picture in camera and the crop it using software.
Professional Looking Selfie Advice
Smiling in any picture sends the best message about your personal brand so always try and smile. I actually recommend practicing your smile with the mirror or arm length selfie just so you can practice making it on demand. Just delete those pictures after taking them (even the good ones).
Another great piece of advice was something I learned from Peter Hurley. He has 6 tips for taking better headshots. You can read the article called NY TIMES exposes Peter’s “6 Tips for Better Portraits”. In a nutshell, the eyes, smile, and chin are key to taking a great picture. Improve those and your picture will look like a pro took it.
Clothing and props are also useful. I always try and use contrasting clothes from the background. I do this because I also like to cutout the background and use it in special purposes like website headers, gravatars, and other places. It also makes you pop in the photo which is always a good thing.
Avoid too much makeup and jewelry. It is distracting and doesn’t photograph well.
The most important thing (other then lighting), is to let your personality shine through your picture. This is the connection people will make with you and showing your true personality will improve the photo way more then if you try and fake it. Be yourself!
Things Not to Do
If you can take anything form this article, then please stop doing the following and posting that as your headshot to the world. Your headshot represents your personal brand and you do not want to represent yourself poorly.
Never use these types of pictures!
Taken at arm length of yourself
Uses a mirror to reflect back to yourself
Avoid pictures of yourself that are blurry or in very low light
Avoid really bad backgrounds that take the focus away from you
Never take a selfie while driving or in a car
These are just common sense. Your pictures when uploaded to the Internet on any social website will live there forever. You can no longer control the picture and other people will be able to view it and share it. Save yourself and only post great looking pictures.
Conclusion
Its not hard to learn how to take a professional photo of yourself if you know what to do. Having some basic gear will be needed and remember lighting is king when it comes to any photograph.
This will take practice so try different things in several different sessions. Remember you are not paying a photographer by the hour so enjoy yourself and have fun. Try different clothes, backgrounds, and poses. Play with your smile, head placement, and eye contact.
Take them over several days over several weeks at different times of the day. Take a million pictures and be brutal when you review them later. Keep the best and destroy the rest.
Do you have any advice on taking a professional looking selfie? If so, leave a comment and let me know. If you like this article, please consider signing up for my email list and be the first to know when new articles are posted.
Most importantly, take more pictures. The more you practice, the better you get. This holds true with most things in life.
The Budget Photo 101 is a participant in the Amazon Services LLC Associates Program, an affiliate advertising program designed to provide a means for sites to earn advertising fees by advertising and linking to amazon.com.
Privacy & Cookies: This site uses cookies. By continuing to use this website, you agree to their use.
To find out more, including how to control cookies, see here:
Cookie Policy
Subscribe To Our Newsletter
Join our mailing list to receive an email when a new article is posted.