If you are like me, you have tons of old photos in boxes all around the house that never get seen. Why not convert and organize old photos so you can enjoy them?
Then they can be shared with friends and family, backed up, and added to a screen saver so you can enjoy them everyday.
If you are like most families, you will have a digital camera with photos throughout your computer, pictures on your phone or tablet, and photos in an album on a book shelf in the den.
With the popularity of social websites, people love seeing old pictures being shared online. They bring back great memories of family and friends.
Being a family historian, I place a great value in family photographs having spent many hours trying to identify relatives from years past.
I am often ecstatic when I find a small note on one of these photos providing some information on a person’s name, place, or time.
One great way to save these special notes or details is to save it in the photo’s metadata.
What is Metadata Anyway?
Today we are very fortunate that most digital photographs today will record a lot of information inside each digital photograph.
This information stored in a photo is called Metadata. It will record information on the camera, location the photo was taken (if available on the camera), and the date and time it was taken.
There is a lot of other information that can be stored in the metadata including who is in the pictures, captions, description, picture tags, rating, and many other details.
This information is very useful to help organize old photos. It will make them easily searchable.
Over the years, I have taken over 50,000 digital pictures (my camera keeps count).
In addition to that, I have 20 years of film pictures in shoe boxes and picture albums.
Organizing this many pictures is a very large task but there are many tools out there to make this a whole lot easier. It is even a little fun in a O.C.D. sort of way.
I would like to touch on several tools I have used and in future articles, talk about each one in more detail to sort your pictures into a neat and organized collection.
6 Easy Steps to Convert and Organize Old Photos
- Scan any old film photographs using any software you like. I make a few recommendations below.
- Name your photograph so it makes sense to you and can sort and be found easily. I list a few free packages I used in this task to make the job easy and go very quickly.
- Organize them into folders and organize your folders into folders
- Set the Metadata for each picture. If using the right software, this will be much easier. I am using MS Photo Gallery and Irfanview.
- Setup face recognition. I use MS Photo Gallery which is a free package.
- As you go through all your pictures, delete the bad ones or so some creative cropping. No sense keeping them around anymore
How to Name Your Pictures?
Let’s talk about the digital pictures first.
If you have a digital camera, it is very likely that it will automatically name your pictures.
These names are not really meaningful to you.
I recommend adding to the front of each picture the date the picture was taken.
Wait, before you think I have way too much free time on my hands (which I don’t!), there are a lot of tools to make this job a walk in the park.
I used a tool called Irfanview (www.irfanview.com). This is freeware software that has been around for over 10 years.
It has a really great feature built in called batch file renames. Here is my naming convention.
YYYY-MM <Picture Description> <Original File Name>
What you have the ability to do is select a large number of pictures and add the photo date to the file name from the metadata.
What I did was I added the year and month to the beginning of each picture so now my pictures would be sorted by date.
Then I created folders for each year and placed the pictures into each folder. This organized my pictures into about 15 folders with about 1000-2000 pictures in each.
Now that I have them all together on my NAS drive (read my post about how I organized the family data on a 1TB NAS array in an earlier article) , now I can really have fun.
Face Recognition?
Now it is time to figure out who is in all these pictures.
There are 2 free tools you can use to do face recognition: Picasa and Windows Photo Gallery.
I have used both. Personally feel that Picasa is a tiny bit better at figuring out who is in each picture but Windows Picture Gallery is a much better at tag management.
Since my goal is to sort and find pictures in my library, I am using Windows Picture Gallery. I should add once all my pictures are tagged and sorted, I will probably use Picasa to edit each picture as I find the editing abilities in Picasa top notch.
To organize old photos, we will be using Tags to write information to the metadata of each picture.
Tags are a way to categorize pictures with details that can be searched for later.
For example, common tags could be “Family”, “Vacation”, or “Zoo”. It can relate very well to hanging folders in a filing drawer. The key to tagging is not to have too many.
Each tag should only represents just a few pictures. If you have too few tags, each tag representing too many pictures. This will not retrieve correct pictures you are looking for and not be useful.
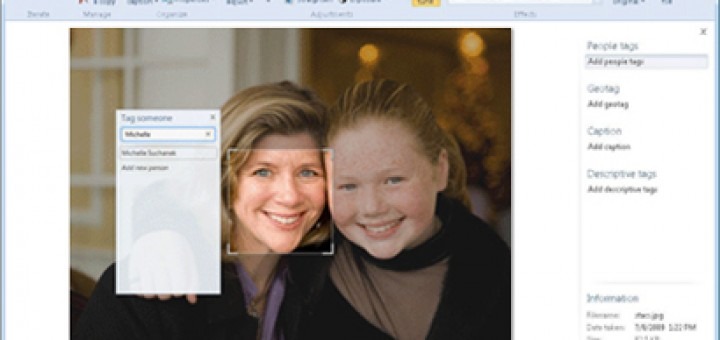
One really neat thing with Windows Photo Gallery is it will automatically add the confirmed people face tags it has learned about to each picture so once everything is properly tags and organized, it will be very easy to search for pictures of a special person at a particular place.
If you are like me, you are probably asking what is a face tag.
Software companies created software that can find all the faces in a picture and compare them to each other. Now you can go through them and add names to each face.
The more faces you add to each name, the better these packages become at identifying new faces. It gets smarter! What I find really neat is its ability to identify a person from childhood to adult.
It often identifies pictures I would have had a hard time figuring out by myself. In no time, you will be finding pages of people’s faces to confirm.
It’s easy now to ignore background people.
To get older film photographs into the picture library, I used 2 different photo scanners.
I bought a negative scanner and a 5×7 photo scanner.
The negative scanner will scan pictures at a higher resolution and the photo scanner can get all the ones with missing negatives.
Once they are scanned in, they will be imported with the current date and time.
Doing a metadata change as you scan will be very helpful in adding the correct date to each picture.
Once they are dated correctly, they can be renamed, filed, and tagged like all the other digital pictures in the library.
Deleting Bad Photos
With everything now organized, it’s now time to clean up and get rid of the bad ones.
You can also take this time to improve the keepers by cropping or improving the lighting.
Once the pictures look pretty good, you are now ready to point your smart TV, computer, or tablet to the library and have random rotating pictures displayed around the house.
I know my family can spend a lot of time staring at the pictures being displayed and we can relive all those great memories.
That’s all there is to organize old photos. Please comment below if you found this helpful or if you have another way of doing it. Let us know your favorite software for cataloging your photos.